
Implementing Bearer Token
in WebAPIs.
Authors
Srinivas & Upendra
Published
October 18, 2023
In this guide, we've explained how to implement Bearer tokens in WebAPIs. By following these steps, you can secure your API endpoints and enable authorization for your web applications.
01Install Required NuGet Packages
Install the following packages in your project using NuGet Package Manager:
- Microsoft.IdentityModel.Tokens
- Microsoft.Owin.Security.Jwt
- System.IdentityModel.Tokens.Jwt
02Create JwtToken Class
Create a JwtToken class in your Models folder. Add the following logic to handle token generation and principal retrieval:
using Microsoft.IdentityModel.Tokens;
using Newtonsoft.Json;
using System;
using System.Collections.Generic;
using System.IdentityModel.Tokens.Jwt;
using System.Linq;
using System.Security.Claims;
using System.Web;
using static BeartokenProject.Models.Model;

namespace BeartokenProject.Models
{
    public class JwtToken
    {
        //Your secret key
        private const string Secret = "Your Secret key";

        public static object GenerateToken(string Client_id)
        {
            List<response> accestoken = new List<response>();
            var symmetricKey = Convert.FromBase64String(Secret);
            var tokenHandler = new JwtSecurityTokenHandler();
            var now = DateTime.UtcNow;
            var tokenDescriptor = new SecurityTokenDescriptor
            {
                Subject = new ClaimsIdentity(new[]
                {
                    new Claim(ClaimTypes.Name, Client_id)
                }),
                Expires = DateTime.Now.AddSeconds(600),
                SigningCredentials = new SigningCredentials(
                    new SymmetricSecurityKey(symmetricKey),
                    SecurityAlgorithms.HmacSha256Signature)
            };
            var stoken = tokenHandler.CreateToken(tokenDescriptor);
            var token = tokenHandler.WriteToken(stoken);
            response r = new response();
            r.access_token = token;
            r.expires_in = 600;
            r.token_type = "Bearer";

            var dataString = JsonConvert.SerializeObject(r);
            return JsonConvert.DeserializeObject(dataString);
        }

        public static ClaimsPrincipal GetPrincipal(string token)
        {
            try
            {
                var tokenHandler = new JwtSecurityTokenHandler();
                var jwtToken = tokenHandler.ReadToken(token) as JwtSecurityToken;

                if (jwtToken == null)
                    return null;
                var symmetricKey = Convert.FromBase64String(Secret);
                var validationParameters = new TokenValidationParameters()
                {
                    RequireExpirationTime = true,
                    ValidateIssuer = false,
                    ValidateAudience = false,
                    ClockSkew = TimeSpan.Zero,
                    IssuerSigningKey = new SymmetricSecurityKey(symmetricKey)
                };
                SecurityToken securityToken;
                var principal = tokenHandler.ValidateToken(token, validationParameters, out securityToken);
                return principal;
            }
            catch (Exception)
            {
                return null;
            }
        }
    }
}03Create BearerTokenController
Implement a secured API controller to issue tokens upon successful identity verification.
using BeartokenProject.Models;
using BeartokenProject.Filter;
using System;
using System.Collections.Generic;
using System.Linq;
using System.Web;
using System.Web.Http;
using System.Net;

namespace BeartokenProject.Controllers
{
    [JwtAuthentication]
    public class BearerTokenController : ApiController
    {
        JwtToken jL = new JwtToken();

        [HttpPost]
        [Route("api/Token/Gettoken")]
        public object Gettoken()
        {
            var Client_id = "1";
            return JwtToken.GenerateToken(Client_id);
        }
    }
}04Create Filter Classes
Create a "Filter" folder and implement these core security handlers:
05Front-End Implementation
Use the acquired token to authorize subsequent API requests from your front-end application:
GetCategory() {
    // Call Gettoken and await its completion
    var url = "api/Token/Gettoken";
    this.generalService.GetData(url).then((data: any) => {
        if (data && data.access_token) {
            this.token = data.access_token;
        }

        this.arr = [];
        this.arr.push({
            BLID: this.loginDet.BLID,
            TokenId: this.loginDet.TokenId,
        });

        var UploadFile = new FormData();
        UploadFile.append("Param", JSON.stringify(this.arr));
        UploadFile.append("Flag", '4');

        var url = this.HomeUrl + "your API url";
        var accessToken = this.token;

        // Set the Authorization header with the access token
        const headers = new HttpHeaders({
            'Authorization': `Bearer ${accessToken}`
        });

        // Use HttpHeaders in the request
        this.http.post(url, UploadFile, { headers }).subscribe(data => {
            this.dataResult = data;
        }, err => {
            this.generalService.ShowAlert('ERROR', 'Authentication failed', 'error');
        });
    });
}06Postman Testing Integration
Follow these three steps to verify your implementation using Postman.
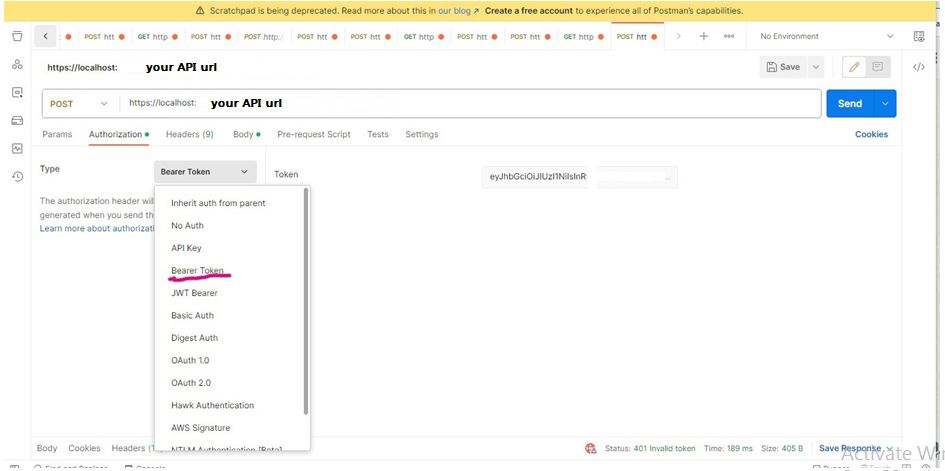
Select Auth Type
Open your POST request in Postman. Navigate to the Authorization tab, click the Type dropdown, and select Bearer Token.
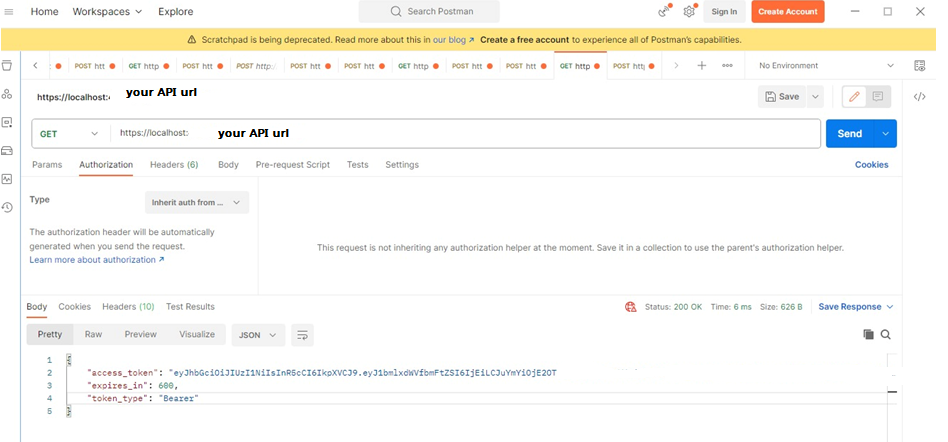
Generate Access Token
Execute your Login/Token API. You should receive a JSON response containing your access_token. Copy this string (without quotes).
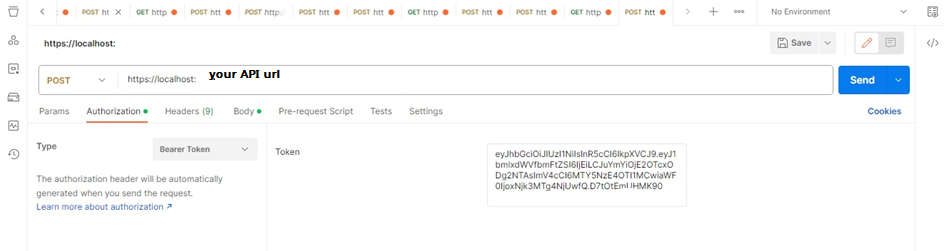
Apply Authorization
Paste the copied token into the Token field. Postman will now automatically add the Authorization: Bearer [token] header to all outgoing requests.
Conclusion
Robust security isn't just a feature—it's a requirement. By implementing Bearer token authentication, you've established a scalable, industry-standard authorization layer that protects your enterprise data while providing a seamless experience for authorized users.